
Custom post types transform a WordPress site from a blogging platform into a powerful Content Management System.
You can use custom post types to create a variety of different content types for your website.
In this guide, I am going to explain how to easily create custom post types in WordPress.
What is the Custom Post Type?
Custom post types are content types like posts and pages
Post Types That Come Bundled with WordPress like that
- Posts
- Pages
- Attachments
- Revisions
- Navigation Menus
- Custom CSS
- Change-sets
WordPress Post Types: Posts
It is just Post simply. The “post” is the post type you’ll use the most in WordPress.
Here, you can add categories and tags to them.
WordPress Post Types: Pages
If you already have a WordPress site, pages are the other content type you’ll be familiar with.
Those are also web pages such as home, contact, about us and etc.
I’m assuming you’re already familiar with the two most common post types: posts and pages.
But what you might not know is that WordPress also comes bundled with a few other post types.
So what’s great is that you can also change various pieces of text, such as renaming Add New Post as Add New Custom Article, replacing the Featured Image text with Add Poster,
And the list goes on.
Moreover, WordPress custom post type allows you to enable the custom field feature in the post editor.
Creating a Custom Post Type by Custom Post Type UI plugin
To create a custom post type, the best easy way is what recommended for beginners because it is safe and super easy
- After install this plugin you need to provide a slug for your custom post type.
- This slug will be used in the URL and in WordPress queries, so it can only contain letters and numbers.

- You can optionally click on the link that says ‘Populate additional labels based on chosen labels’. Doing so will fill in the rest of the label fields down below.
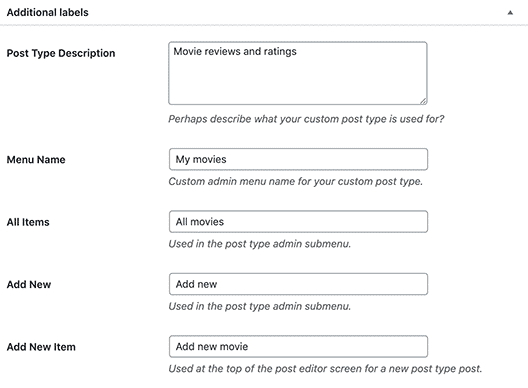
- Comes the post type settings option. From here you can set up different attributes for your post type. Each option comes with a brief description explaining what it does
- You can see the option to select which editing features this post type would support. Simply check the options that you want to be included.
Creating a Custom Post Type Manually with PHP coding
It is necessary to use init for the hook in add_action(). The register_post_type() function takes the arguments.
function prefix_create_custom_post_type() {
    $args = array();
    register_post_type( 'post-type-slug' , $args );
}
add_action( 'init', 'create_custom_post_type' );
For some more information, you can reference those codes.
function prefix_create_custom_post_type() {
    /**
     * The $labels describes how the post type appears.
     */
    $labels = array(
        'name'          => 'Products', // Plural name
        'singular_name' => 'Product'   // Singular name
    );

    /**
     * The $supports parameter describes what the post type supports
     */
    $supports = array(
        'title',        // Post title
        'editor',       // Post content
        'excerpt',      // Allows short description
        'author',       // Allows showing and choosing author
        'thumbnail',    // Allows feature images
        'comments',     // Enables comments
        'trackbacks',   // Supports trackbacks
        'revisions',    // Shows autosaved version of the posts
        'custom-fields' // Supports by custom fields
    );

    /**
     * The $args parameter holds important parameters for the custom post type
     */
    $args = array(
        'labels'              => $labels,
        'description'         => 'Post type post product', // Description
        'supports'            => $supports,
        'taxonomies'          => array( 'category', 'post_tag' ), // Allowed taxonomies
        'hierarchical'        => false, // Allows hierarchical categorization, if set to false, the Custom Post Type will behave like Post, else it will behave like Page
        'public'              => true,  // Makes the post type public
        'show_ui'             => true,  // Displays an interface for this post type
        'show_in_menu'        => true,  // Displays in the Admin Menu (the left panel)
        'show_in_nav_menus'   => true,  // Displays in Appearance -> Menus
        'show_in_admin_bar'   => true,  // Displays in the black admin bar
        'menu_position'       => 5,     // The position number in the left menu
        'menu_icon'           => true,  // The URL for the icon used for this post type
        'can_export'          => true,  // Allows content export using Tools -> Export
        'has_archive'         => true,  // Enables post type archive (by month, date, or year)
        'exclude_from_search' => false, // Excludes posts of this type in the front-end search result page if set to true, include them if set to false
        'publicly_queryable'  => true,  // Allows queries to be performed on the front-end part if set to true
        'capability_type'     => 'post' // Allows read, edit, delete like “Post”
    );

    register_post_type('product', $args); //Create a post type with the slug is ‘product’ and arguments in $args.
}
add_action('init', 'prefix_create_custom_post_type');
Save that then go back to the admin dashboard. You will get something like this:
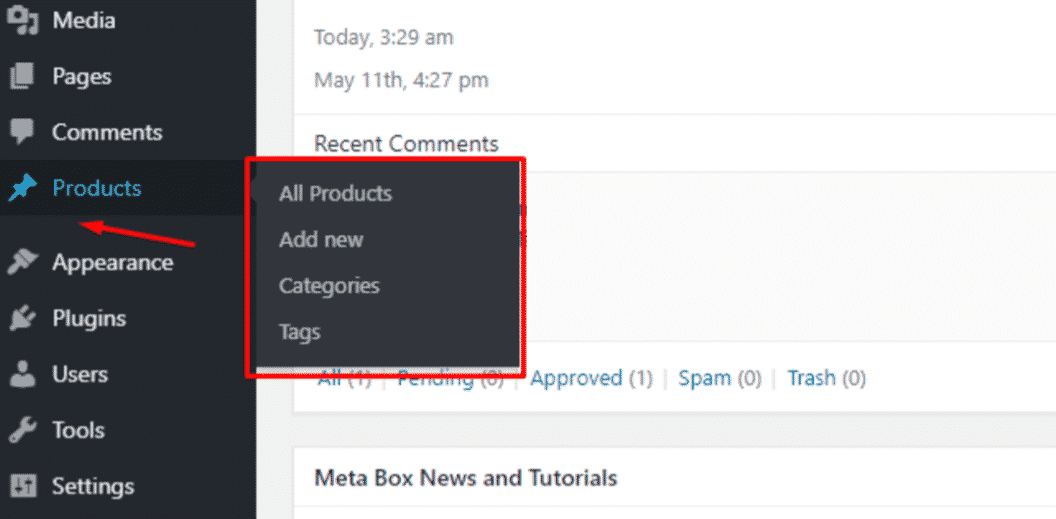
You are done creating a new custom post type with code.