
WordPress’ custom taxonomies make it possible to structure large amounts of content in a logical, well-organized way.
In WordPress, categories are set up as a hierarchical taxonomy, and tags are set up as a multifaceted taxonomy.
What is a WordPress Taxonomy?
Taxonomy is a process of grouping content based on certain properties and criteria.
That way the content is structured better and, as a result, it is easier to navigate through it.
For example, WordPress categories and tags are a type of WP taxonomy.
Those used most often are categories and tags. These two are an example of two types of taxonomy.
Categories can have parent-child relationships with each other while Tags can’t. One category can be a parent category to several others.
Tags are non-hierarchical, therefore, they don’t have parent-child relationships.
How to Create WordPress Taxonomies Manually with Code
What should we do before coding?
Make sure the FTP you have is working to add some code.
We strongly recommend you make a backup of your site before getting started.
Locate the Theme Functions
Under current “Theme Files” locatefunctions.php
Deciding whether or not your taxonomy needs to be hierarchical or non-hierarchical is necessary as each requires a different code.
For Hierarchical Taxonomy
//firstly hook into init action and call create_england_taxonomies when it 	fires
add_action( 'init', 'create_counties_hierarchical_taxonomy', 0 );
//next create a custom taxonomy name it counties for your posts
function create_counties_hierarchical_taxonomy() {
// add your new taxonomy and make it hierarchical
//firstly do the translations part for GUI
  $labels = array(
    'name'              => _x( 'Counties', 'taxonomy general name' ),
    'singular_name'     => _x( 'Counties', 'taxonomy singular name' ),
    'search_items'      =>  __( 'Search Counties' ),
    'all_items'         => __( 'All Counties' ),
    'parent_item'       => __( 'Parent County' ),
    'parent_item_colon' => __( 'Parent County:' ),
    'edit_item'         => __( 'Edit County' ),
    'update_item'       => __( 'Update County' ),
    'add_new_item'      => __( 'Add New County' ),
    'new_item_name'     => __( 'New County Name' ),
    'menu_name'         => __( 'Counties' ),
  );
// register the taxonomy
  register_taxonomy('counties',array('england'), array(
    'hierarchical'      => true,
    'labels'            => $labels,
    'show_ui'           => true,
    'show_in_rest'      => true,
    'show_admin_column' => true,
    'query_var'         => true,
    'rewrite'           => array( 'slug' => 'county' ),
  ));
}
For Non-Hierarchical Taxonomy
// firstly hook into init action and call create_towns_nonhierarchical_taxonomy when it fires
add_action( 'init', 'create_towns_nonhierarchical_taxonomy', 0 );
function create_towns_nonhierarchical_taxonomy() {
// labels part for the GUI
  $labels = array(
    'name'                       => _x( 'Towns', 'taxonomy general name' ),
    'singular_name'              => _x( 'Towns', 'taxonomy singular name' ),
    'search_items'               => __( 'Search Towns' ),
    'popular_items'              => __( 'Popular Towns' ),
    'all_items'                  => __( 'All Towns' ),
    'parent_item'                => null,
    'parent_item_colon'          => null,
    'edit_item'                  => __( 'Edit Town' ),
    'update_item'                => __( 'Update Town' ),
    'add_new_item'               => __( 'Add New Town' ),
    'new_item_name'              => __( 'New Town Name' ),
    'separate_items_with_commas' => __( 'Separate towns with commas' ),
    'add_or_remove_items'        => __( 'Add or remove towns' ),
    'choose_from_most_used'      => __( 'Choose from the most used towns' ),
    'menu_name'                  => __( 'Towns' ),
  );
// register the non-hierarchical taxonomy
  register_taxonomy('towns','england',array(
    'hierarchical'               => false,
    'labels'                     => $labels,
    'show_ui'                    => true,
    'show_in_rest'               => true,
    'show_admin_column'          => true,
    'update_count_callback'      => '_update_post_term_count',
    'query_var'                  => true,
    'rewrite'                    => array( 'slug' => 'town' ),
  ));
}
In both the above cases, you will need to substitute the taxonomy name, labels, and post types with the actual ones you wish to use.
If you are done, you can upload the changed function.php by FTP.
To display WordPress Custom Taxonomies, you need to configure where to show them.
Establish where you want to display your custom taxonomy
Install this plugin on the site.
That will show the name of the template in use for the current page, and you can safely deactivate the plugin once you have pinpointed the template you need to work with
Add the code to where your custom taxonomy is to show
Need to add some code in function.php
<?php the_terms( $post->ID, 'towns', 'Towns: ', ', ', ' ' ); ?>How to Create WordPress Taxonomies Using a Plugin
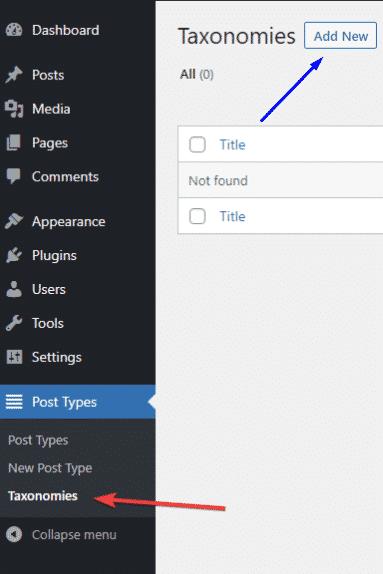
- INSTALL AND ACTIVATE both Custom Post Types and Custom Taxonomies Plugin. After activate the plugin you can see this screen in the site.
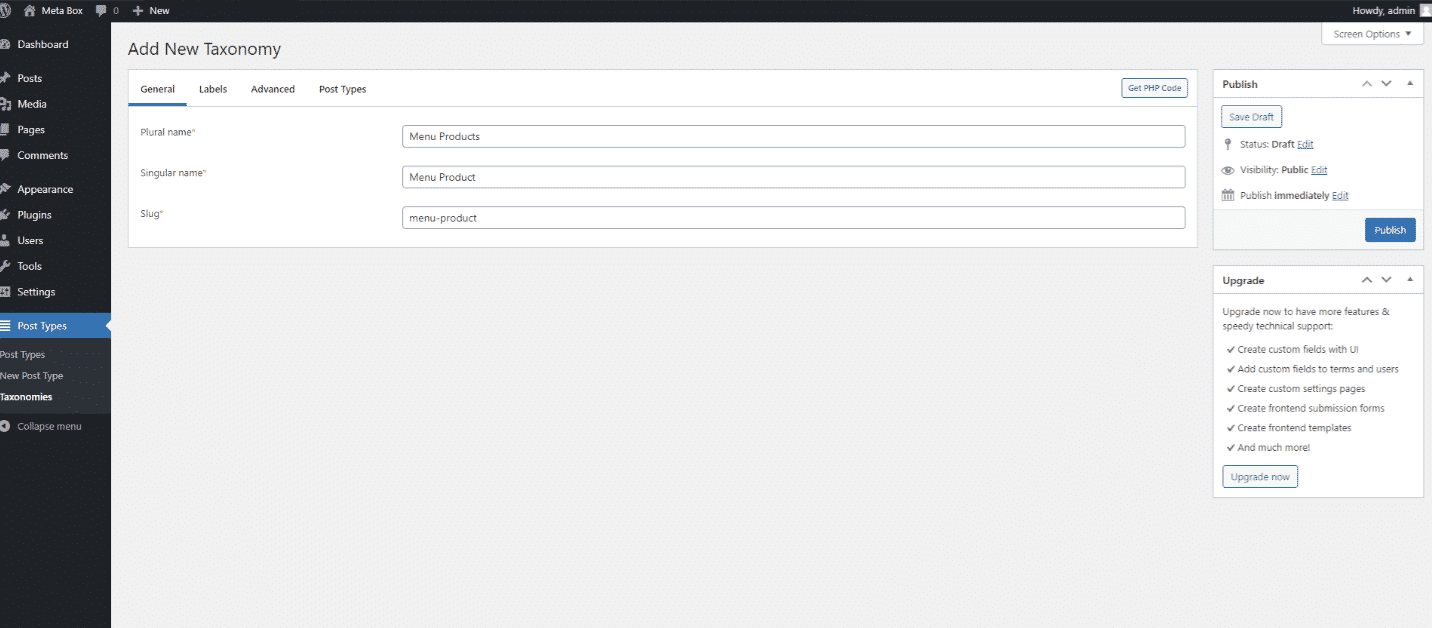
- Configuration and Fill the fields with the information you want
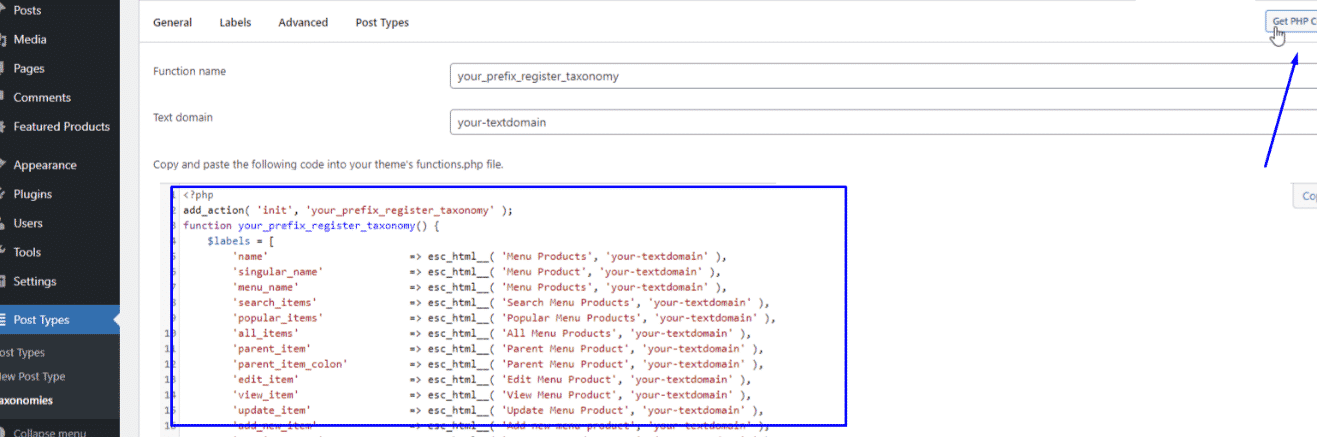
- Almost there. Finish that. Save your newly created taxonomy to complete the creation process in WordPress. Btw, you can see a block of codes that was automatically generated when you click Get PHP Code.
Now, you can see the result in wp-admin.
This article provides a general view on Custom Taxonomy creation through codes and the Post Types plugin.